Documentation Index
Fetch the complete documentation index at: https://docs.factory.ai/llms.txt
Use this file to discover all available pages before exploring further.
Setup
In any JetBrains IDE (2025.3+) with JetBrains AI (make sure to update to the latest version):- Open Settings > Tools > AI Assistant > Agents or select “Install From ACP Registry…” in the agent picker menu.
- Find Factory Droid.
- Click Install.
- Open the AI Chat panel and select Factory Droid from the agent dropdown.
- If you are unauthenticated you will see a message indicating you must authenticate.
- Keep track of the device code rendered, and click the “Login” button.
- This will open your web browser and ask you to login/signup to Factory, followed by a screen to confirm your device’s code.
(Alternative) Manual Setup
If you prefer to manually configure Droid inside JetBrains, you can follow the instructions below.-
Install the Droid CLI (supported on all operating systems except Windows ARM machines)
-
Install via:
-
Ensure the
droidbinary is on your PATH (or note its full path).
-
Install via:
-
(Optional) Factory API key - instead of using the login flow, you can set up an API key:
- Sign up at https://app.factory.ai.
- Add a payment method if prompted.
- Create an API key at https://app.factory.ai/settings/api-keys.
- Set the
FACTORY_API_KEYenvironment variable in your shell (for example, addexport FACTORY_API_KEY=your_key_hereto your shell profile).
You cannot sign up for Factory or manage billing entirely inside JetBrains.
Account creation and API key management always happen in the web app.
Configure Factory Droid as an Agent
Edit~/.jetbrains/acp.json and add a Factory Droid entry under agent_servers:
command– full path to thedroidbinaryargs– run Droid in exec mode and speak ACP back to JetBrains
env block:
Start a Droid Session in JetBrains
Once the agent server is configured, you interact with Droid entirely through the AI Assistant UI.Open the AI Chat Panel
- Search Everywhere: Press
Shift+Shift, type “AI Assistant”, and open the tool window. - Menu: Go to View → Tool Windows → AI Assistant (exact name may vary slightly by IDE).
Start a New Chat with Factory Droid
- In the AI Chat panel, click + New Chat.
- In the bottom-left agent dropdown, choose Factory Droid.
- Start chatting as you would in the CLI.

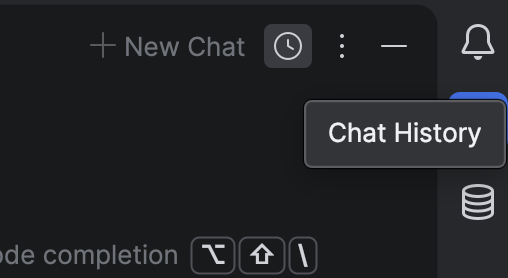
Resume Existing Sessions
JetBrains manages sessions through the AI Chat UI rather than CLI commands.- In the AI Chat panel, click the clock icon in the top-right corner.
- Choose a past conversation to reopen it.
Models and Autonomy Controls
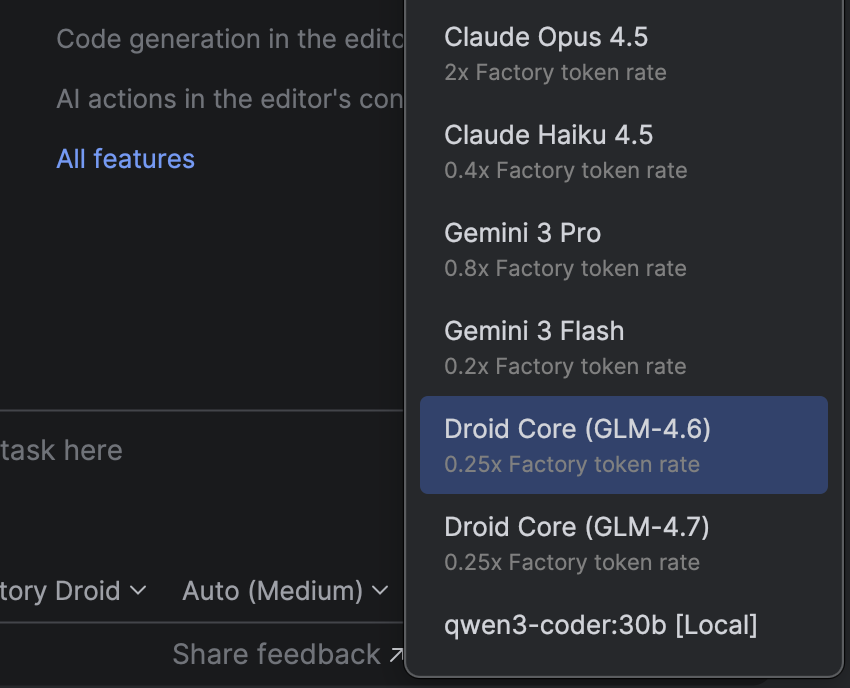
You can change models and autonomy levels directly from the AI Chat footer.Switch Models
- Use the model dropdown at the bottom of the AI Chat panel.
- Pick any Factory-supported model (for example, Claude Opus/Sonnet, GPT-5.1 variants, or others configured via BYOK).
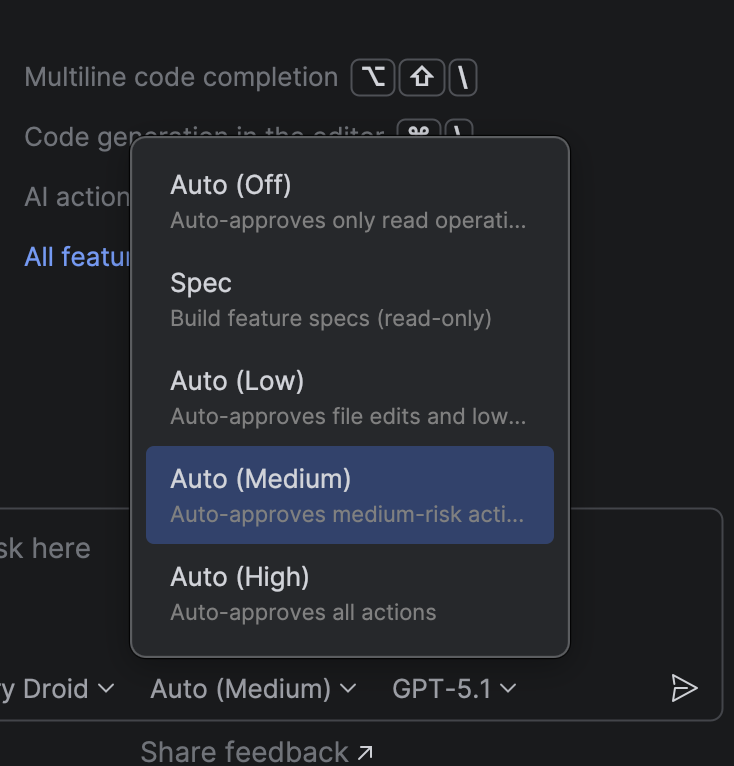
Change Autonomy Level
- Use the autonomy dropdown next to the model selector.
- Choose the autonomy level that matches your risk tolerance and workflow.
- Start with a planning-first flow (low autonomy, spec-style prompts) for medium and large tasks.
- Once you are happy with the plan, increase autonomy to Auto low or Auto medium so Droid can execute more steps without constant confirmation.
Editor Context and Limitations
The current JetBrains integration speaks ACP but does not yet expose full editor context to Droid.- No automatic sharing of open files, selections, or diagnostics
- No IDE-native diff viewer wired directly to Droid patches
- Use clear prompts, reference files by path, and rely on autonomy modes and spec-style planning to manage larger changes.
Troubleshooting
If Factory Droid does not appear or respond in AI Chat:- Verify the CLI:
- Run
droid exec --output-format acpin a regular terminal to confirm the binary and API key work.
- Run
- Double-check the agent server configuration:
- Correct path to
droid argsincludes bothexecand--output-format acpFACTORY_API_KEYis present and valid
- Correct path to
- Confirm you are not on Windows on ARM, which is not yet supported.